
Tuesday, December 18, 2012


Thursday, December 6, 2012
Kitchen Lava Lamp
I found this idea online and it is PERFECT to demonstrate density! The oil floats on the water because it is less dense. If you add an alkaseltzer tablet it makes bubbles that are less dense than oil and rise to the top carrying drops of water with it. Once they reach the top and the gas escapes the water sinks back down. Very cool! Click HERE to see the video

 |
| A water bottle with air, oil, and water |
 |
| Add some food colouring to the water! |

 |
| Alkaseltzer bubbles - LAVA LAMP!! |
 |
| Very pretty!! |
Kitchen Lava Lamp Video
How cool is this?? Click HERE to learn more and get instructions on how to easily do this at home!

Beans - 10 days
Our bean plants have grow so quickly!! In just 10 days most have outgrown their CD cases!! I had the kids measure them and then label all of the parts of the plant right on the case. They all got to take them home to transplant and enjoy. Some winter beans sound YUMMY!!
It also became a major feature on our class bulletin board!
Click HERE to see the original post.


It also became a major feature on our class bulletin board!
Click HERE to see the original post.


Squash it!
I wanted to see if this would work. I found the idea using a pumpkin but they are out of season. Hopefully an acorn squash will work. Basically you cut it open, shove in some dirt and water, and let it grow!! Keep posted for our progress.


Wednesday, November 28, 2012
Gummy Bear Osmosis
The idea is that if you put a gummy bear in water it is going to swell and absorb the water (high concentration of water in the dish to the low concentration of water in the bear). When you put a gummy bear in salt water now there is a higher relative concentration of water in the gummy bear than in the salt water AND a higher concentration of salt in the water than in the bear. The salt can not move in to the bear because it's selectively permeable membrane wont let in such big molecules so the water from the bear has to move out to equalize the concentrations If you look closely you can even see the red colouring leaking into the salt water from the bear. Very cool.
If that blew your mind just watch this video to explain osmosis again.
**See HERE for how we challenged Canadian Astronaut, Jeremy Hansen, to the gummy bear lab challenge under the sea! See the results HERE**
 |
| AFTER only TWO hours! - Notice how the ones on the left are larger and the ones on the right (salt) are smaller and the red dye has spread in to the salt solution. |
 | |
|
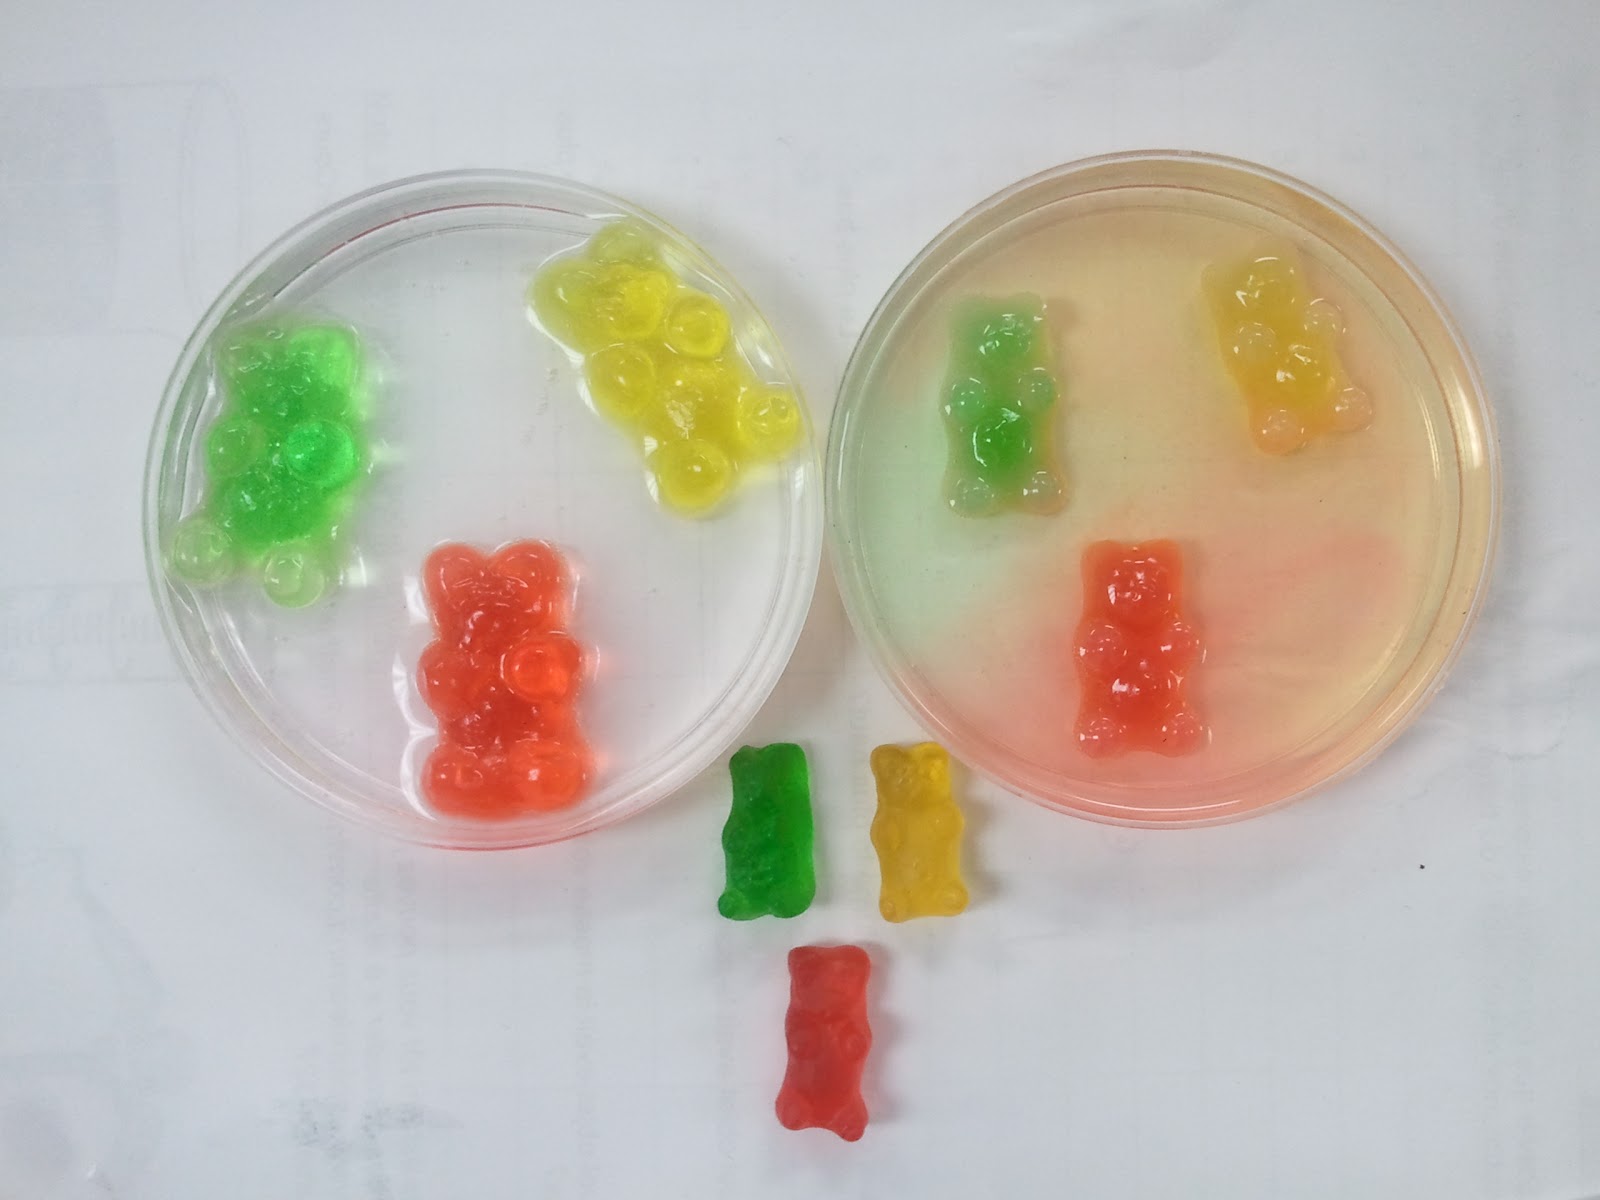 |
Look at the results after 24 hours!! The ones in water are HUGE and even though the ones in the salt water have grown they are not nearly as large and have lost their colour into the solution. I wonder what they will look like once they dry out?  |
Compost plants II
We have amazing results already from our "Planting from your compost" lab! These pictures are after 4-5 days!! Se HERE for the original lab and explanation.
 |
| Garlic after 4 days then 5 days! |
 |
| Carrot tops after 4 days |
 |
| Beet tops after 4 days |
Beans After a Week


Strange plants!
A hypercolour pencil for the first person to comment below (login with your google account or add your name) who can tell me what this flower is called!!
Hint: It is parasitic, can be over three feet tall, and has no leaves, stems, or roots!! The centre can hold up to six litres of water!

Hint: It is parasitic, can be over three feet tall, and has no leaves, stems, or roots!! The centre can hold up to six litres of water!
Tuesday, November 27, 2012
Density Tower
I did another fun demonstration for my grade 8s this week. First we looked at what solid objects float on water and which sink (see photo below for results). Then we talked about density and how less dense fluids will float on those that are more dense. I constructed a density tower with NINE different fluids. Then we took the same solid objects and observed which ones floated, which ones sank and at what level they rested. It was very good at showing them everything we have been learning and something you can try at home. See this website for instructions.
To illustrate the practical applications, other then petrochemical ones, I made them each a mini Shirley Temple showing them how orange juice floats on grenadine! YUM!!


To illustrate the practical applications, other then petrochemical ones, I made them each a mini Shirley Temple showing them how orange juice floats on grenadine! YUM!!
 |
| Supplies |
 |
| What floats on water? |
 |
| Tower before and after! |


Separation Labs
The grade 8s learnt all about separating mixtures in a very fun Science lab this month. They got to observe or perform various tasks including distillation, filtration, evaporation, chromatography, and using magnets to separate metals. It was very interesting and there were some surprising results.


Tree Lab
My grade 7 science class got to learn all about Canadian trees, most from Alberta. This summer and fall I collected leaves, branches, cones, and pictures of all the species of trees we have at our cabin by Calling Lake. I made laminated cards with a diagram, photo, and pressed leaf/branch of each species. The students circulated around the stations and uses a dichotomous key to figure out which tree they were observing. So the next time you are in the woods have them point them all out to you.
Any teachers out there who want my templates, worksheets, or power point presentation to go with the lab please email me!
Any teachers out there who want my templates, worksheets, or power point presentation to go with the lab please email me!


Planting from your compost
For our grade 7 science unit on plants we wanted to see which plants would re-grow and even produce food from our kitchen scraps. Keep posted for an update on the growth
Click HERE to see the results


Click HERE to see the results


Beans in a Box
As part of our grade 7 plants unit we are growing beans in a CD case to be able to see the root and stem growth right from day one and to measure and label all of the parts. They either water them with fertilizer or without to compare the impact on growth. The kids will be bringing them home when we are done and you can transplant the beans and have a little mid-winter snack! If you could return the CD cases to re-use next year that would be awesome!! Keep posted for updates and pictures on their growth.
 From "Time to Spill the Beans"
Click HERE to see how they have grown after a week and HERE for after 10 days!!


Click HERE to see how they have grown after a week and HERE for after 10 days!!


Smart Plants
We learnt about how plants use their vascular system to absorb water. See the dye that has gone up the celery stalk to the leaves?
We are also going to do a flower dissection where they will pick apart and discover all of the parts of a flower.

 |
| After a day |
 |
| After 5 minutes |
We are also going to do a flower dissection where they will pick apart and discover all of the parts of a flower.

Saturday, November 17, 2012
Winter flowers
It has certainly brightened up my day and my classroom having all of the beautiful flowers my students have made on display! To learn the parts of a flower they had to build their own flowers, label the parts, name it, and even give a description of it's adaptations. They had a great time and I am very proud of the results!


Monday, November 5, 2012
Lab Safety and Equimpent

Subscribe to:
Posts (Atom)